Online Non Verbal Reasoning Test - Non Verbal Reasoning Test 2
- This is a FREE online test. Beware of scammers who ask for money to attend this test.
- Total number of questions: 20.
- Time allotted: 30 minutes.
- Each question carries 1 mark; there are no negative marks.
- DO NOT refresh the page.
- All the best!
Marks : 2/20
Test Review : View answers and explanation for this test.
Each of the following questions consists of five figures marked A, B, C, D and E called the Problem Figures followed by five other figures marked 1, 2, 3, 4 and 5 called the Answer Figures. Select a figure from amongst the Answer Figures which will continue the same series as established by the five Problem Figures.
Select a figure from amongst the Answer Figures which will continue the same series as established by the five Problem Figures.

 and the element that reaches the encircled position gets replaced by a new element.
Each of the following questions consists of two sets of figures. Figures A, B, C and D constitute the Problem Set while figures 1, 2, 3, 4 and 5 constitute the Answer Set. There is a definite relationship between figures A and B. Establish a similar relationship between figures C and D by selecting a suitable figure from the Answer Set that would replace the question mark (?) in fig. (D).
Select a suitable figure from the Answer Figures that would replace the question mark (?).

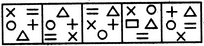
In each problem, out of the five figures marked (1), (2), (3), (4) and (5), four are similar in a certain manner. However, one figure is not like the other four. Choose the figure which is different from the rest.
Choose the figure which is different from the rest.
Choose the figure which is different from the rest.
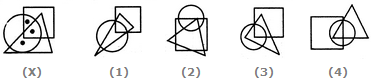
In each of the following questions, you are given a figure (X) followed by four alternative figures (1), (2), (3) and (4) such that figure (X) is embedded in one of them. Trace out the alternative figure which contains fig. (X) as its part.
Find out the alternative figure which contains figure (X) as its part.


In each of the following questions, select a figure from amongst the four alternatives, which when placed in the blank space of figure (X) would complete the pattern.
Identify the figure that completes the pattern.


In each of the following questions, select a figure from amongst the four alternatives, which when placed in the blank space of figure (X) would complete the pattern.
Identify the figure that completes the pattern.


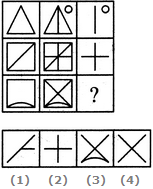
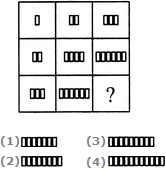
In each of the following questions, find out which of the answer figures (1), (2), (3) and (4) completes the figure matrix ?
Select a suitable figure from the four alternatives that would complete the figure matrix.
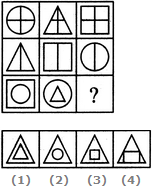
In each of the following questions, find out which of the answer figures (1), (2), (3) and (4) completes the figure matrix ?
Select a suitable figure from the four alternatives that would complete the figure matrix.
Select a suitable figure from the four alternatives that would complete the figure matrix.
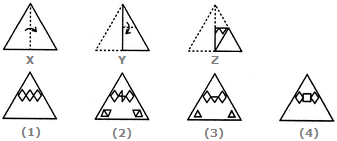
In each of the following problems, a square transparent sheet (X) with a pattern is given. Figure out from amongst the four alternatives as to how the patter would appear when the transparent sheet is folded at the dotted line.
Find out from amongst the four alternatives as to how the pattern would appear when the transparent sheet is folded at the dotted line.

Each of the following questions consists of a set of three figures X, Y and Z showing a sequence of folding of apiece of paper. Figure (Z) shows the manner in which the folded paper has been cut. These three figures are followed by four answer figures from which you have to choose a figure which would most closely resemble the unfolded form of figure (Z).
Choose a figure which would most closely resemble the unfolded form of Figure (Z).
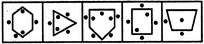
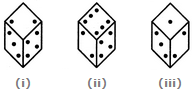
From amongst the figures marked (1), (2), (3) and (4), select the figure which satisfies the same conditions of placement of the dots as in figure (X).
Select the figure which satisfies the same conditions of placement of the dots as in Figure-X.
Select the figure which satisfies the same conditions of placement of the dots as in Figure-X.
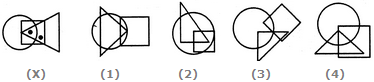
In each of the following questions, a key figure marked (X) is given, followed by four other alternative figures marked (1), (2), (3) and (4). It is required to select one figure from the alternatives, which fits exactly into figure (X) to form a complete square.
Select a figure from the given four alternatives which fits exactly into Figure-X to form a complete square.


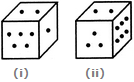
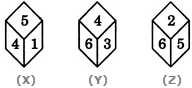
Given below are three different positions of a dice. Find the number of dots on the face opposite the face bearing 3 dots.
From figures (i), (ii) and (iii), we conclude that 3, 4, 6 and 1 dots appear adjacent to 2 dots. Therefore, 5 dots appear opposite 2 dots. Now, from figures (i) and (iii), we conclude that 2, 4 and 1 dots appear adjacent to 3 dots. Therefore, either 5 or 6 dots appear opposite 3 dots. Since, 5 dots appear opposite 2 dots, it follows that 6 dots appear opposite 3 dots.
Three different positions X, Y and Z of a dice are shown in the figures given below. Which number lies at the bottom face in position X?
From positions X and Y we conclude that 1, 5, 6 and 3 lie adjacent to 4. Therefore, 2 must lie opposite 4. From positions Y and Z we conclude that 4, 3, 2 and 5 lie adjacent to 6. Therefore, 1 must lie opposite 6. Thus, 2 lies opposite 4, 1 lies opposite 6 and consequently 5 lies opposite 3.
As analysed above, the number on the face opposite 5 is 3. In position X, since 5 lies on the top, therefore 3 must lie at the bottom face.
Two positions of a block are given below. When 1 is at the top, which number will be at the bottom?