Online Non Verbal Reasoning Test - Non Verbal Reasoning Test - Random
- This is a FREE online test. Beware of scammers who ask for money to attend this test.
- Total number of questions: 20.
- Time allotted: 30 minutes.
- Each question carries 1 mark; there are no negative marks.
- DO NOT refresh the page.
- All the best!
Marks : 2/20
Test Review : View answers and explanation for this test.
Each of the following questions consists of two sets of figures. Figures A, B, C and D constitute the Problem Set while figures 1, 2, 3, 4 and 5 constitute the Answer Set. There is a definite relationship between figures A and B. Establish a similar relationship between figures C and D by selecting a suitable figure from the Answer Set that would replace the question mark (?) in fig. (D).
Select a suitable figure from the Answer Figures that would replace the question mark (?).

Each of the following questions consists of two sets of figures. Figures A, B, C and D constitute the Problem Set while figures 1, 2, 3, 4 and 5 constitute the Answer Set. There is a definite relationship between figures A and B. Establish a similar relationship between figures C and D by selecting a suitable figure from the Answer Set that would replace the question mark (?) in fig. (D).
Select a suitable figure from the Answer Figures that would replace the question mark (?).

 The 'S'-shaped element gets laterally inverted; the rectangle rotates through 90o, the '=' symbol rotates through 90o; the arrow gets vertically inverted and the circle gets shaded.
Select a suitable figure from the Answer Figures that would replace the question mark (?).

In each problem, out of the five figures marked (1), (2), (3), (4) and (5), four are similar in a certain manner. However, one figure is not like the other four. Choose the figure which is different from the rest.
Choose the figure which is different from the rest.

Choose the figure which is different from the rest.

Choose the figure which is different from the rest.
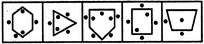
In each problem, out of the five figures marked (1), (2), (3), (4) and (5), four are similar in a certain manner. However, one figure is not like the other four. Choose the figure which is different from the rest.
Choose the figure which is different from the rest.

Choose the figure which is different from the rest.

Choose the figure which is different from the rest.

Choose the figure which is different from the rest.

Count the number of parallelogram in the given figure.

The figure may be labelled as shown.
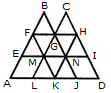
The simplest parallelograms are EMLA and NIDJ i.e. 2 in number.
The parallelograms composed of two components each are BFMG, CGNH, GMKN, FGME, GHNM, MNKL, FGNM, GHIN and MNJK i.e. 9 in number.
The parallelograms composed of three components each are FGLA, ENKA, GHDJ and MIDK ie. 4 in number.
The parallelograms composed of four components each are FGJK, GHKL, FBNK, CHKM, EFHN and MFHI i.e. 6 in number.
The parallelograms composed of seven components each are FHKA and FHDK i.e. 2 in number.
Total number of parallelograms in the figure = 2 + 9 + 4 + 6 + 2 = 23.
In each of the following questions, choose the correct mirror images of the given image of the Fig.(X) from amongst the four alternatives (1), (2), (3) and (4) given along with it.
Choose the correct mirror image of the given figure (X) from amongst the four alternatives.

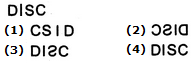
In each of the following questions, you are given a combination of alphabets and/or numbers followed by four alternatives (1), (2), (3) and (4). Choose the alternative which is closely resembles the water-image of the given combination.
In each of the following questions, you are given a figure (X) followed by four alternative figures (1), (2), (3) and (4) such that figure (X) is embedded in one of them. Trace out the alternative figure which contains fig. (X) as its part.
Find out the alternative figure which contains figure (X) as its part.


In each of the following questions, you are given a figure (X) followed by four alternative figures (1), (2), (3) and (4) such that figure (X) is embedded in one of them. Trace out the alternative figure which contains fig. (X) as its part.
Find out the alternative figure which contains figure (X) as its part.


In each of the following questions, select a figure from amongst the four alternatives, which when placed in the blank space of figure (X) would complete the pattern.
Identify the figure that completes the pattern.


In each of the following questions, find out which of the answer figures (1), (2), (3) and (4) completes the figure matrix ?
Select a suitable figure from the four alternatives that would complete the figure matrix.

In each of the following problems, a square transparent sheet (X) with a pattern is given. Figure out from amongst the four alternatives as to how the patter would appear when the transparent sheet is folded at the dotted line.
Find out from amongst the four alternatives as to how the pattern would appear when the transparent sheet is folded at the dotted line.

From amongst the figures marked (1), (2), (3) and (4), select the figure which satisfies the same conditions of placement of the dots as in figure (X).
Select the figure which satisfies the same conditions of placement of the dots as in Figure-X.

A dice is numbered from 1 to 6 in different ways.
If 1 is opposite to 2 and adjacent to 3 and 4, then which of the following statements is necessarily true?